Introduction
Drawing a Christmas tree is a fun and festive activity, perfect for artists of all skill levels. Whether you’re a beginner or just looking to add some creativity to your holiday season, this easy step-by-step guide will help you create a beautiful Christmas tree. Grab your pencil, paper, and let’s get started!
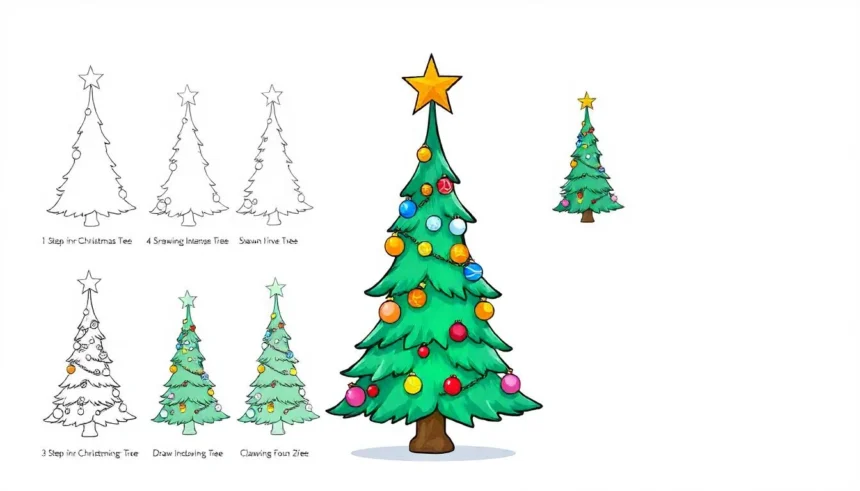
Step 1: Draw the Basic Triangle Shape
Begin by drawing a simple triangle in the center of your paper. This triangle will serve as the basic shape of your tree. It doesn’t have to be perfect; a slightly curved or wavy triangle will make your tree look more natural.
Tip:
If you want a symmetrical tree, use a ruler or lightly sketch a vertical guideline in the middle of the page before drawing the triangle.
Step 2: Add Layers to the Tree
Now, let’s make our tree look fuller by adding layers of branches:
- Draw three to five curved lines inside the triangle, starting from the top and working downwards. These lines should slightly overlap.
- Extend small jagged edges or wavy lines from each curved line to form the tree’s boughs.
- Make sure the branches get wider as you move downward to give your tree a natural, triangular shape.
Tip:
For a fluffier tree, make the layers more uneven and random.
Step 3: Sketch the Trunk
Draw a small rectangle or slightly curved trunk at the base of your tree. The trunk should be narrower than the bottom of the tree to keep the proportions balanced.
Tip:
For added detail, add small vertical lines inside the trunk to give it a wood texture.
Step 4: Add Ornaments and Decorations
Now comes the fun part—decorating your Christmas tree!
- Baubles: Draw small circles or ovals scattered throughout the tree.
- Garlands: Add curved lines that wrap around the branches like a ribbon.
- Lights: Sketch tiny ovals or small dots along the garlands.
- Star or Topper: Draw a star, angel, or any tree topper you like at the top of your tree.
Tip:
For a realistic effect, make some ornaments overlap slightly behind the branches.
Step 5: Add Shading and Texture
To bring your tree to life, add shading:
- Lightly shade under the branches to create depth.
- Darken some areas where branches overlap.
- Use small, quick pencil strokes to mimic pine needles.
Tip:
If using colored pencils, layer different shades of green for a more realistic look.
Step 6: Final Touches and Outlining
- Go over the final drawing with a darker pencil or ink to make it stand out.
- Erase any extra guidelines or rough sketches.
- If using colors, add highlights and shadows for a vibrant effect.
Tip:
Using a white gel pen or eraser, add tiny highlights on ornaments and lights to make them look shiny!
Conclusion
Congratulations! You’ve successfully drawn a Christmas tree. Feel free to customize it with different decorations, presents under the tree, or even a snowy background. The most important thing is to have fun and let your creativity shine.
Happy drawing and happy holidays!